
Let’s face it, a lot of a data engineer’s time is spent waiting to see if things executed as expected or for data to be refreshed; We write pipelines, buy expensive replication software, or sometime manually move files (I hope we still aren’t in this day and age), and in the end all of this has a cost associated with it when working in a cloud environment. In the case of Databricks jobs, we often find ourselves creating clusters just to move data, where the cluster lays dormant for the most part during these extractions. In my eyes, that’s wasteful and could probably be improved upon.
If you’re going for real time updates to your data you’d opt for a streaming architecture that would use Kafka or Azure Event Hubs in the cases of Microsoft shops. This means an additional layer to produce these events that are published and a way to consume these messages from a partition/topic.
In many cases, we don’t need data at this velocity and can settle for hourly or daily refresh rates, but we still find ourselves having to maintain pipelines that function in a pull manner rather than a push manner and introduce some cost in terms of complex orchestration. In a Microsoft shop, we would put this orchestration into Azure Data Factory and incur data movement cost as well as activity cost. In a pure Databricks shop, this would mean having a cluster do the work of fetching and sinking datasets from a source at an incurred job and DBU cost.
But what if there was a way, in a very specific scenario, that we could have our source of data produce the files itself and then inform Databricks to process them? Well, if you happen to use SQL Managed Instances and Databricks, you are in luck! (As long as you add a Azure SQL Database to the mix).
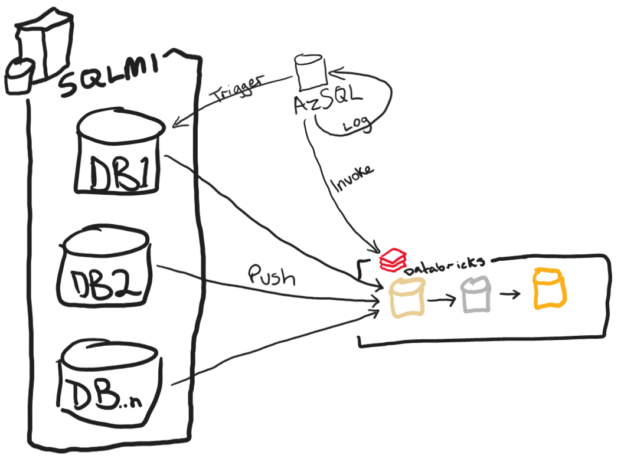
Two features were GA’d late last year during Ignite/PASS, that re-sparked interest for me in a hypothesis I developed along with a contractor earlier in the year. “Can we somehow leverage CETAS to push data to storage to offload the workload on either ADF or Databricks in complex multi-database source scenarios?”. Take the following sketch as a real-life example of what we might encounter:
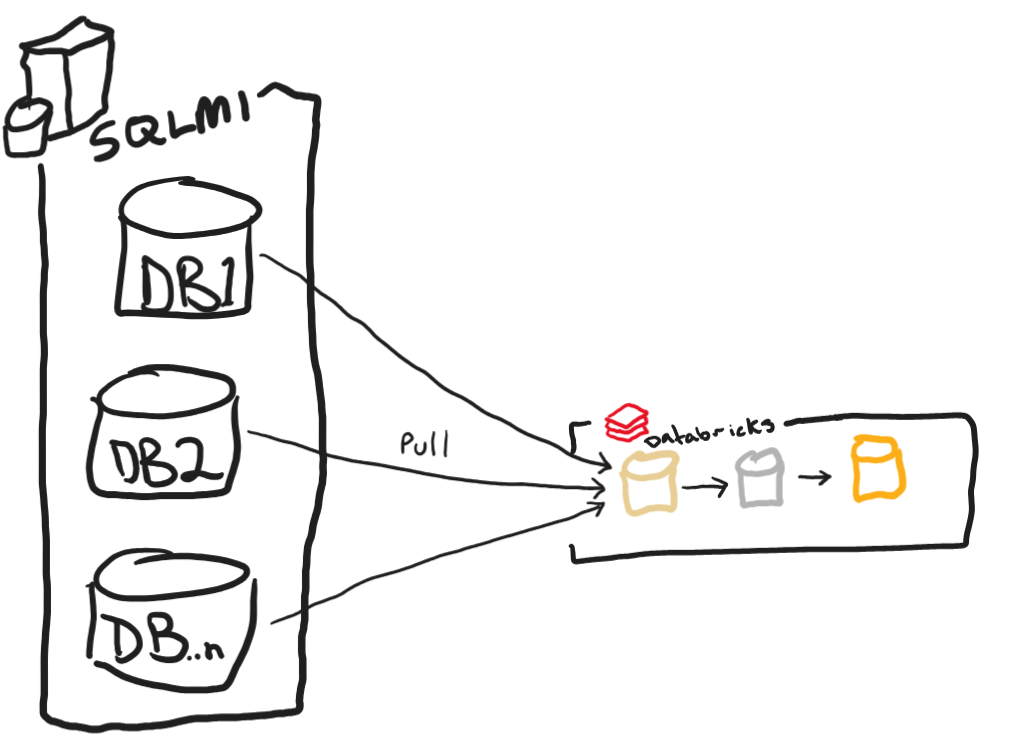
Here we have a SQL Managed Instance with multiple source databases which all represent instances of a POS system and we want to consolidate them into a single Delta table in a medallion architecture. We would need a rather complex ADF pipeline to accomplish this or a notebook that can run multiple thread in parallel in Databricks to move these data for us, but this is still a pull model. What if we wanted to accomplish pushing data to ADLS/Databricks? Here is where I explore the feasibility of doing so with CETAS as well as calling APIs from Azure SQL as seen below:

What if I told you that this was all accomplishable without the use of ADF or Databricks to sink the data and trigger the pipeline? Well it is and can be done completely in T-SQL thanks to three features: Create External Table As Select (CETAS), sp_invoke_external_rest_endpoint and sp_execute_remote.
In order to accomplish this you will need both a SQL Managed Instance to house your source OLTP type data and an Azure SQL Database to house a database that controls the orchestration and invocation of the Databricks API. You will see a little bit later that direct invocation of the Databricks endpoints is not supported from the stored procedure so an Azure Function will be needed to be added to the mix in order to reach it as well some networking to support connectivity between all of these resources. In the end you will have a fair bit of things in play:
First of all, we need to setup both the Azure SQL and the SQL Managed Instance to talk to each other as well as a storage account that is mounted to your Databricks environment. For the Azure SQL the following code will need to be executed one time to allow the ability to execute remote commands on your SQL Managed Instance:
CREATE MASTER KEY ENCRYPTION BY PASSWORD = 'a123STRONGpassword!';
CREATE DATABASE SCOPED CREDENTIAL SQL_Credential
    WITH IDENTITY = 'crossDBUser',
    SECRET = 'a123STRONGpassword!';
DROP EXTERNAL DATA SOURCE RemoteSqlMI
CREATE EXTERNAL DATA SOURCE RemoteSqlMI
WITH (
    TYPE = RDBMS,
    LOCATION = '<yourDbName>.public.xxxxxxxxxx.database.windows.net,<port>',
    DATABASE_NAME = 'demo',
    CREDENTIAL = SQL_Credential
);
I’m not a network guy, so don’t sue me for exposing my SQL MI as a public endpoint, I’m sure there’s a way to make this more secure, so bear with me as I tried to do this as easy as possible. Feel free to make this up to snuff with our security policies. Also note that the credential you create here must match a SQL Account username and password exactly on SQL MI.
For the initial setup on the SQL MI, you will have to enable Change Tracking on the database and table level and setup access to your storage account. In order to write files to storage from SQL MI, so additional configuration needs to be done via PowerShell or Azure CLI to enable this functionality, which you can read about in the CETAS documentation. If succesfully done you should see the following:

Once this functionality is enabled, you can now create a workspace identity and an External Data Source for your landing zone or bronze layer in Databricks with the following code:
CREATE MASTER KEY ENCRYPTION BY PASSWORD = 'a123STRONGpassword!';
CREATE DATABASE SCOPED CREDENTIAL [WorkspaceIdentity] WITH IDENTITY = 'managed identity';
GO
CREATE EXTERNAL FILE FORMAT [ParquetFF] WITH (
FORMAT_TYPE = PARQUET,
DATA_COMPRESSION = 'org.apache.hadoop.io.compress.SnappyCodec'
);
GO
CREATE EXTERNAL DATA SOURCE [SQLwriteable] WITH (
LOCATION = 'adls://bronze@<yourStorageAccount>.blob.core.windows.net/',
CREDENTIAL = [WorkspaceIdentity]
);
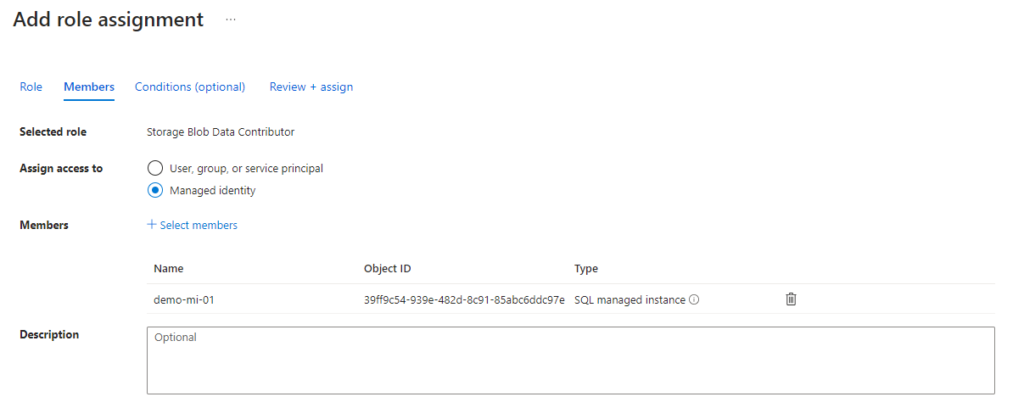
GOBe sure to also grant the newly created Managed Identity of the SQL Managed Instance as a Storage Contributor on both your storage account and the container in which you choose to write to; “bronze” in the code above.
Now I will share some very hacked together examples of what the meat of this process looks like. First, let’s take a look at a very simple example of how to log the progress of the data pushes and remote procedure calls. Below you can see the table structures and logging procedures I used:
create table dbo.changeTrackingLog (
	ctLogId int identity(1, 1) primary key,
	srcTableName varchar(100),
	ctVersion bigint,
	startDateTime datetime,
	endDateTime datetime
)
go

create or alter procedure dbo.startCTLoad
	@tableName varchar(100),
	@ctVersion bigint
as
begin
	insert into dbo.changeTrackingLog (srcTableName, ctVersion, startDateTime)
	select @tableName, @ctVersion, getutcdate()

	select @@IDENTITY as ctLogId
end
go

create or alter procedure dbo.updateCTLoad
	@ctLogId bigint
as
begin
	update dbo.changeTrackingLog
	set endDateTime = getutcdate()
	where ctLogId = @ctLogId
end
go
And the first part of the magic of how all this works is handled by this procedure:
create or alter procedure dbo.exportExternalDatabaseTableToParquet
	@tableName varchar(100),
	@fullLoad int = 0
as
begin
	declare @currentWatermarkId int
	declare @previousWatermarkId int
	declare @sqlCmd varchar(1000)
	declare @extSql nvarchar(100)
	declare @ctLoadId int
	begin try
		select @previousWatermarkId = coalesce((select top 1 ctVersion
			from dbo.changeTrackingLog
			where srcTableName = @tableName
			and endDateTime is not null
			order by startDateTime desc), 0)

		create table #watermark (WatermarkID int, extraInfo varchar(1000))

		insert into #watermark
		exec sp_execute_remote
			N'RemoteSqlMI',
			N'SELECT Watermark = CHANGE_TRACKING_CURRENT_VERSION()'

		set @currentWatermarkId = (select WatermarkID from #watermark)

		create table #ctLoad (ctLogId int)

		insert #ctLoad
		exec dbo.startCTLoad @tableName, @currentWatermarkId

		select @ctLoadId = ctLogId from #ctLoad

		if @fullLoad = -1
		begin
			set @extSql = 'exec dbo.exportSqlToParquet ''' + @tableName + ''', 0'
		end
		else
		begin
			set @extSql = 'exec dbo.exportSqlToParquet ''' + @tableName + ''', ' + cast(@previousWatermarkId as varchar(100))
		end

		create table #remoteOutput (partitionName varchar(1000), extraInfo varchar(1000))

		insert #remoteOutput
		exec sp_execute_remote
		N'RemoteSqlMI',
		@extSql

		exec sp_invoke_external_rest_endpoint @url = 'https://<yourAzFunc>.azurewebsites.net/api/callJob',
			@method = 'POST'

		exec dbo.updateCTLoad @ctLoadId

		select 'created and processed partition : ' + partitionName as outputMsg from #remoteOutput

	end try
	begin catch
		 SELECT ERROR_NUMBER() AS ErrorNumber
		,ERROR_SEVERITY() AS ErrorSeverity
		,ERROR_STATE() AS ErrorState
		,ERROR_PROCEDURE() AS ErrorProcedure
		,ERROR_LINE() AS ErrorLine
		,ERROR_MESSAGE() AS ErrorMessage;
		 --Log error
	end catch
end
Next for the SQL Managed Instance, we will need to create a procedure that takes a couple arguments to know how much of a table to export to ADLS. It will need a table name and a Change Tracking Version number, both of which are stored in the Azure SQL Database and executed as remote commands.
create or alter procedure dbo.exportSqlToParquet
	@srcTable varchar(1000),
	@ctVersion bigint
as
begin
	declare @sqlCmd varchar(1000)
	declare @colSelect varchar(1000)
	declare @colJoin varchar(1000)
	declare @folderHNS varchar(100)
	declare @schemaName varchar(100)
	declare @tableName varchar(100)
	declare @extTableName varchar(100)

	select @schemaName = substring(@srcTable, 0, charindex('.', @srcTable)), @tableName = substring(@srcTable, charindex('.', @srcTable) + 1, 100)
	set @extTableName = @tableName + '_Ext'

	begin try
		exec('if (select 1
			from sys.external_tables as e
			join sys.schemas as s
			on e.schema_id = s.schema_id
			where s.name = ''' + @schemaName + '''
			and e.name = ''' + @extTableName + ''') is not null
			drop external table ' + @schemaName + '.' + @extTableName)

		set @folderHNS = (select 'yyyy=' + cast(datepart(yyyy, getutcdate()) as varchar(4)) + '/MM=' + right('00' + cast(datepart(MM, getutcdate()) as varchar(2)), 2) + '/dd=' +  right('00' + cast(datepart(dd, getutcdate()) as varchar(2)), 2) + '/')

		set @colSelect = (select string_agg(case c.is_identity when 1 then 'ct.' else 'x.' end + c.name, ', ') as colSelect
			from sys.columns as c
			join sys.tables as t
			on c.object_id = t.object_id
			join sys.schemas as s
			on t.schema_id = s.schema_id
			where s.name = @schemaName
			and t.name = @tableName)

		set @colJoin = (select string_agg('ct.' + c.name + ' = x.' + c.name, ' and ') as colJoin
			from sys.columns as c
			join sys.tables as t
			on c.object_id = t.object_id
			join sys.schemas as s
			on t.schema_id = s.schema_id
			where s.name = @schemaName
			and t.name = @tableName
			and c.is_identity = 1)

		if @ctVersion <= 0
		begin
			set @sqlCmd = 'CREATE EXTERNAL TABLE ' + @srcTable + '_Ext WITH (
				LOCATION = ''entity=' + @tableName + '/' + @folderHNS + ''',
				DATA_SOURCE = [SQLwriteable],
				FILE_FORMAT = [ParquetFF]
			) AS
			select *
			, GETUTCDATE() as changeTimeUTC
			, ''I'' as changeOperation from ' + @srcTable
		end
		else if @ctVersion > 0
		begin
			set @sqlCmd = 'CREATE EXTERNAL TABLE ' + @srcTable + '_Ext WITH (
				LOCATION = ''entity=' + @tableName + '/' + @folderHNS + ''',
				DATA_SOURCE = [SQLwriteable],
				FILE_FORMAT = [ParquetFF]
			) AS
			SELECT ' + @colSelect + '
			, GETUTCDATE() as changeTimeUTC
			, ct.SYS_CHANGE_OPERATION as changeOperation
			FROM CHANGETABLE(CHANGES ' + @srcTable + ', ' + cast(@ctVersion as varchar(100)) + ') as ct
			LEFT JOIN ' + @srcTable + ' x (NOLOCK)
			ON ' + @colJoin
		end

		exec(@sqlCmd)
		exec('drop external table ' + @schemaName + '.' + @extTableName)
		select 'entity=' + @tableName + '/' + @folderHNS  as outputMsg
	end try
	begin catch
		exec('if (select 1
			from sys.external_tables as e
			join sys.schemas as s
			on e.schema_id = s.schema_id
			where s.name = ''' + @schemaName + '''
			and e.name = ''' + @extTableName + ''') is not null
			drop external table ' + @schemaName + '.' + @extTableName)
		select ERROR_MESSAGE() AS outputMsg
	end catch
end
I originally wrote the procedures with hardcoded schemas and table names but was nice enough to change all of that around so this code is actually usable with any table with an identity column, but note if you have a composite primary key on the table then that part will likely have to be changed. In addition to all of this, I also setup some test data on SQL MI:
ALTER DATABASE demo
SET CHANGE_TRACKING = ON
(CHANGE_RETENTION = 7 DAYS, AUTO_CLEANUP = ON)

create table dbo.demoTable (
	demoId int identity(1, 1) primary key,
	field1 varchar(40),
	desc1 varchar(100)
)

ALTER TABLE dbo.demoTable
ENABLE CHANGE_TRACKING
WITH (TRACK_COLUMNS_UPDATED = ON)

insert into dbo.demoTable (field1, desc1)
select 'abc123', 'initial insert'
union all
select 'def234', 'initial insert'
union all
select 'ghi345', 'initial insert'
union all
select 'jkl456', 'initial insert'
union all
select 'mno567', 'initial insert'
union all
select 'pqr678', 'initial insert'
union all
select 'stu789', 'initial insert'
union all
select 'vwx890', 'initial insert'
go
Now to test this for an initial load the following was ran:
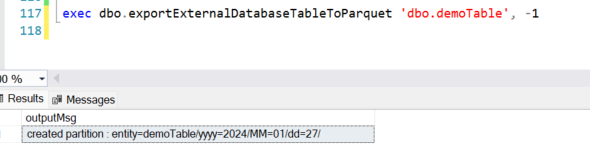
As you can see above, an optional full load parameter is supplied with a value of “-1”, which in turn runs this portion of the exportSqlToParquet procedure on SQL MI:
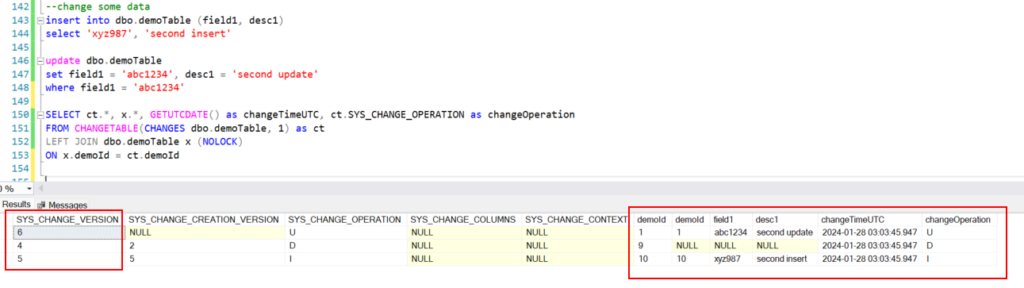
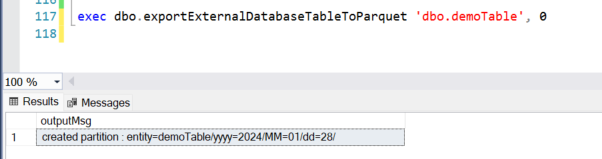
This is a wide open select from the entire table where the current CHANGE_TRACKING_CURRENT_VERSION is stored in the Azure SQL database’s log table. This is often a time-consuming process to run in either Azure Data Factory or Databricks, here we offload this work directly to SQL MI. Once completed and logged, the next run of this procedure will pick up any changes that happened after this version. Now it’s time to test out incremental changes and see what their values will be prior to processing them to ADLS. Please note that the inital load was ran on Jan 27th and the next incremental load was ran on Jan 28th.
Running the following creates another file in a different directory:
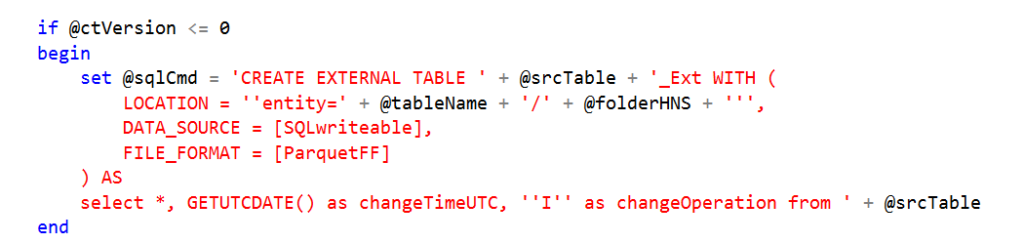
Which is produced by the following logic:
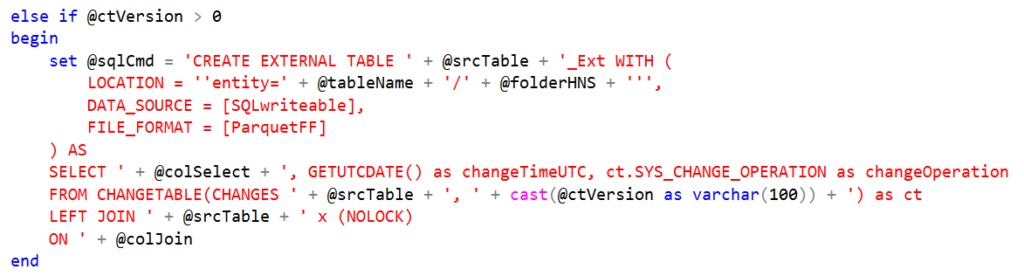
Since this procedure attempts to be dynamic in nature, both the selection of columns and joining of columns needs to be determined by using metadata tables in SQL. These are stored in the @colSelect and @colJoin variables. In addition to those, a partitioned folder location is also created to store the files in. By partitioning where the files are stored, the CETAS command will not fail due to a directory already existing with files within it. This is key to this method as if you were to run another update during the same day period, it would fail. If this is a requirement for your usage of this method, you will want to further partition your data to the time in which the file is generated to avoid this error, but be forewarned, too many partitions can be a bad thing, so use these sparingly. It is also a good time to mention that this framework does not support reloading, although it would not be too hard to implement by usage of another Azure Function.
Up to this point, all you’ve seen is the export of data from SQL, but how does this get processed? First let’s look at how these files are stored.
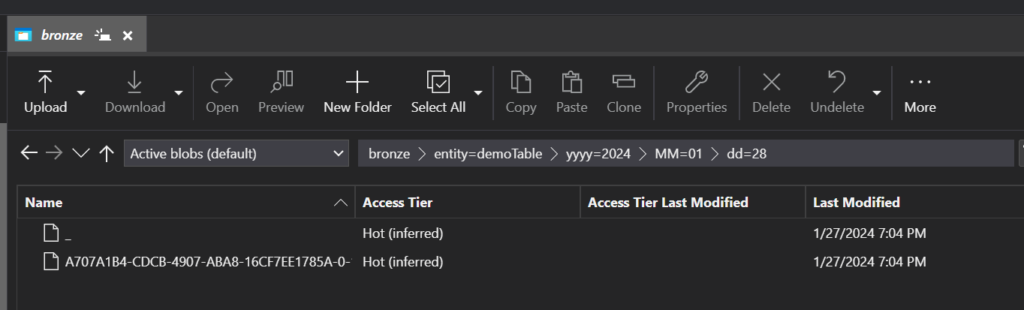
As seen above, these parquet files are stored in partitioned folders allowing for multiple CETAS commands to create files and for Databricks/Spark to do things like predicate pushdown/partition pruning. If you are familiar with Data Virtualization with SQL, you know that these commands actually create objects in SQL that you can query, but this is not the intention here. Right after we create these SQL objects we immediately dispose of them, which allows us to reuse the same names each time the procedure is executed. You will even see in the code that clean up is conducted prior to execution to ensure that the objects do not exist.
What you choose to do with these files in ADLS is now up to you. You can use this framework to populate a landing zone and have an ingestion framework clean up the landing zone as it reads new files, or you could do like I have and point a Delta Live Table with AutoLoader at the location.
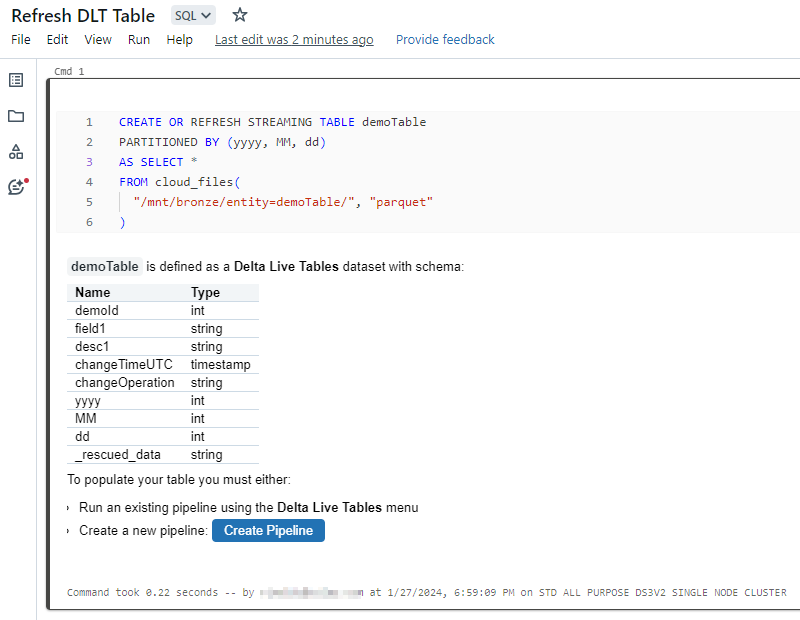
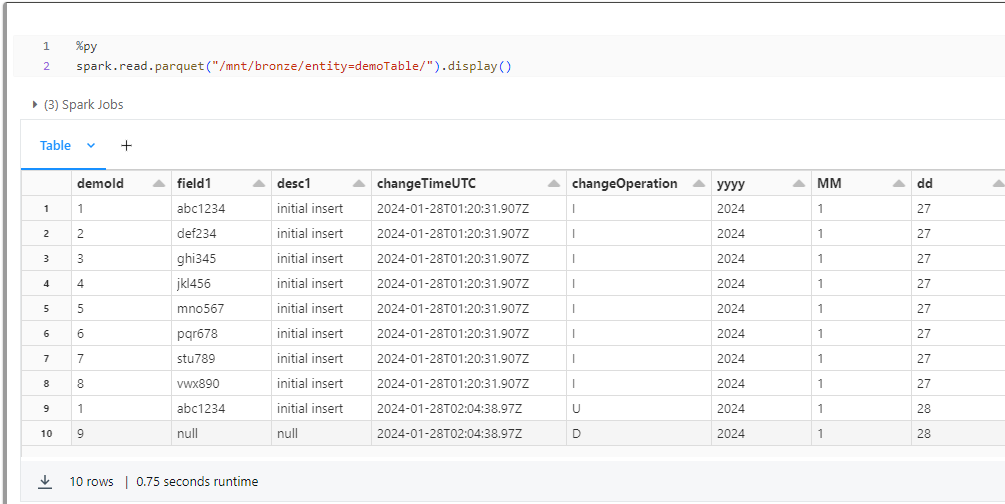
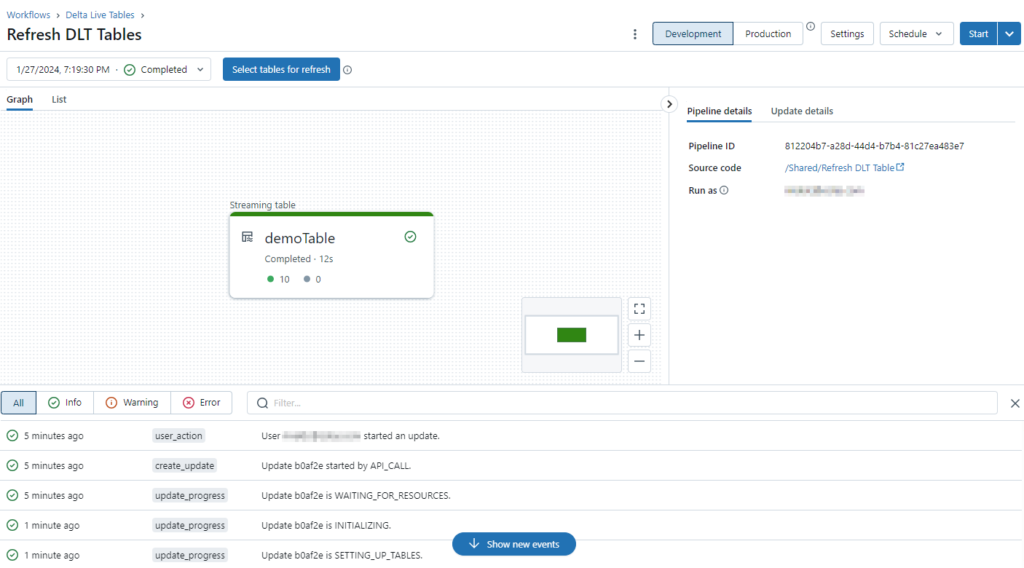
You can see the following when exploring the partitioned data with PySpark:
and the pipeline run:
To bring this all together we will want to automatically trigger this pipeline once we have created new files from SQL MI. In order to do that we will need to invoke this pipeline via the Databricks API for pipeline refresh. You would think this could be done with SQL, but you are given the following error:
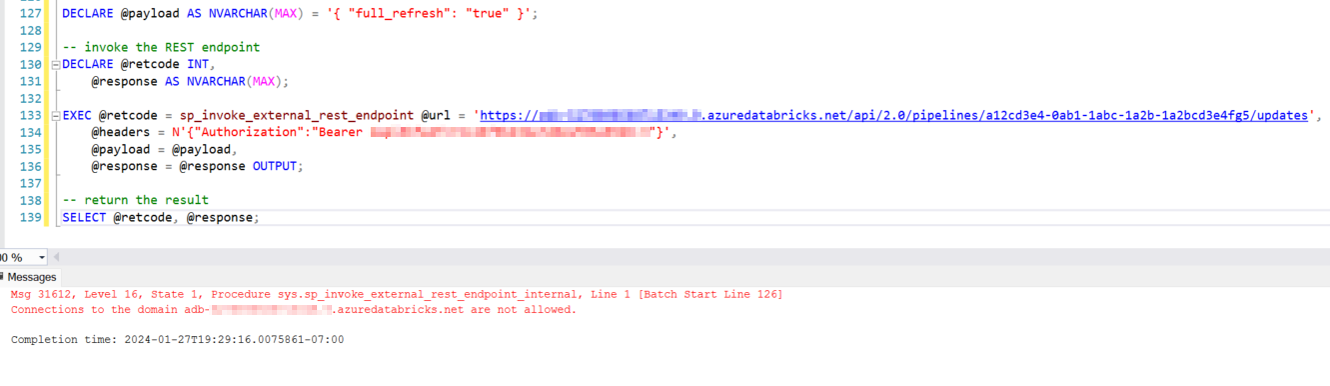
As noted in this documentation, you are only allowed to access certain domains. Surprisingly *.azuredatabricks.net not being one of them. So for now, you will have to wrap this API call within another API hosted in Azure Functions. You can deploy a low-cost PowerShell serverless function to accomplish this.
using namespace System.Net

param($Request, $TriggerMetadata)

$dbrAPI = 'https://adb-<yourDatabricksOrgId>.azuredatabricks.net/api/'
$apiHeaders = @{
    Authorization = "Bearer dapi<yourDatabricksAPIKey>"
}
$pipelineId = '<yourPipelineId>'
$jobCreateUri = $dbrAPI + "2.0/pipelines/$pipelineId/updates"
$jobCreateJson = '{ "full_refresh": "true" }'
$newJob = Invoke-RestMethod -Uri $jobCreateUri -Method POST -Headers $apiHeaders -Body $jobCreateJson -UseBasicParsing
$body = '{"content":"Created update with request_id: $($newJob.request_id)"}'

Push-OutputBinding -Name Response -Value ([HttpResponseContext]@{
    StatusCode = [HttpStatusCode]::OK
    Body = $body
})
Note in the above that $body must be a valid Json string that is returned from the function or the call to sp_invoke_external_rest_endpoint will fail. Also, this was lazy coding since you would normally pass in parameters for OrgId, PipelineId, and the rest body.
The following line of code in the Azure SQL stored procedure calls this function:

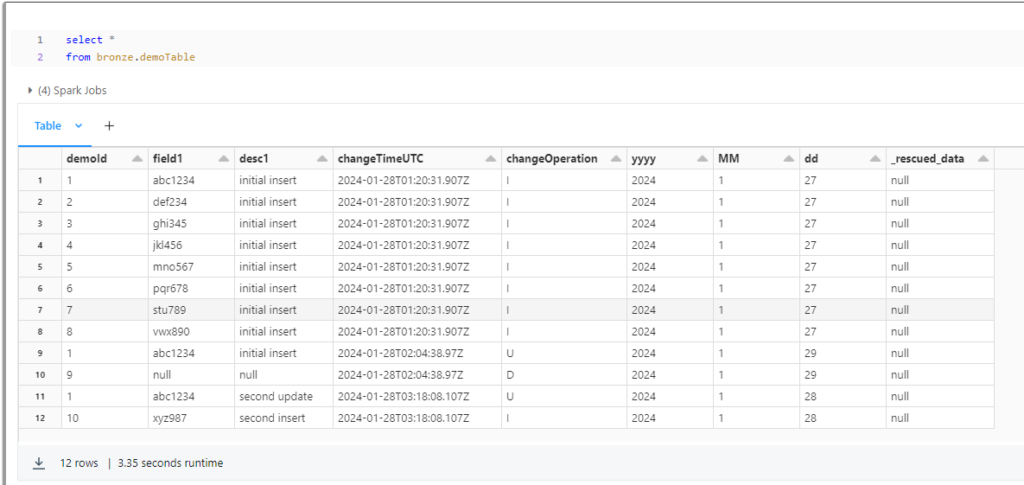
After updating a couple more rows and invoking the function again, you can see the final results here:
In conclusion, using these different resources and newly available functionality, we can achieve a very low-cost push model to refresh a medallion architecture in Databricks. Be aware that there are certain considerations I haven’t attempted here: deleting existing files during a full load, DLT refresh types, better error handling/logging and restartability, scheduling, as well as creating any metadata that drives the Azure SQL orchestration.
The complete source code can be found here.